I’ve received a lot of questions recently on the features in the “Inspector” panel, so this post will focus on the second button of the Inspector – “References”.
 The “Document References” section allows you to add links to external reference information but more importantly scenes, characters, and locations in your own manuscript!
If you’re looking for a simple way to index which characters or locations are used in specific scenes then the “keywords” inspector (future blog about this) may be a better choice for you, as it’s integrated into the Scrivener search feature. However if your approach to producing a novel is to outline heavily, and flesh out as you go, then the document references is an invaluable tool.
I tend to use both the keywords and the references.
When you create a scene, you would typically add a brief synopsis in the Inspector pane that acts as a ‘reminder’ to you of what is to take place and why. If you’ve already compiled a list of characters, and locations you can then link to those in the Document References section.
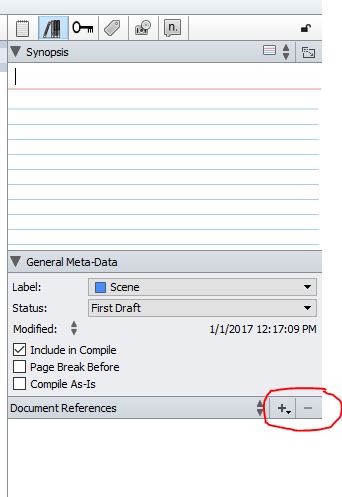
To do this simply click the “+” sign highlighted in the image to the right, select “Internal Reference” and then navigate through the tree view of your manuscript to the desired location or character sketch.
Once you reach the stage that you’re ready to actually write the scene, you now have an instant reminder of the purpose from your synopsis, and access to the details of who you planed to include and the location the action takes place.
Why is this useful?
It’s useful in two ways:
- Rapid access to your character sketches can make sure you don’t make a mistake with your character – nothing’s worse than the blue eyed hero of chapter 1 gazing at the love of his life from deep brown eyes in chapter 9!
- As you write, so you will enrich or develop a character or location. This quick link allows you rapid access to the character or location sketch and makes it easy for you to add to the definition, making more information available to you in future scenes. This helps enormously in continuity issues. Was the gun on the dresser loaded the last time you were in that room, or empty?
If you read my first post on Character Building this use of Document References makes it easy to grow the Character Journey I described as you write your story.
In addition to the ‘Internal References’, Scrivener allows you to reference external data also, and I find this invaluable. I use external references rarely in actual scenes, but use them a lot in location sketches.
If I have a scene taking place in a “real-world” location, then to save copying into Scrivener the wealth of information from the internet I’ll tend to copy pertinent data, things I know I really need, but will use Document References to store links to the actual sites that hold valuable information. This way all my research material, and links to even more of it, stay within my project, right where I need them each time I sit down to write.
Document References are a very powerful feature and eliminate the need for maintaining separate documents of links, or a growing list of “Favorites” in your browser of choice. The developers of Scrivener worked hard to make sure an author has ready access to everything they could need, so we can focus on what we do best – write.
Happy Scrivening everyone – and hope you enjoyed this second installment of Scrivener Tips.
Please leave comments, and feel free to suggest articles you would like covered in future posts.
If you’re interested in my novel: “To Raise a King” written, and formatted in Scrivener then check it out in the Amazon store… To Raise a King

Very clear and helpful. I am just really starting with Scrivener so need all the help I can get. Is it actually calle Inspector panel? Mine does not look the same, maybe I need to update? Thanks for the help, waiting for the next blog.
LikeLiked by 1 person
Hi, and thanks for leaving a comment 🙂 Yes the application refers to the side panel on the right of the application screen as the Inspector panel. You may have yours hidden? Look for a large blue circle with a white “i” on the right hand side at the top of the screen next to the search box. If click that it will act as a toggle and reveal or hide the inspector panel. There’s all many of useful features in there, some of which I’ve addressed in these posts.I’ll be covering MetaData and snapshots in the next post. Thanks again!
LikeLike